

When websites fail to load or throw persistent connection errors, the culprit is often a corrupted or outdated Domain Name System (DNS) cache. Browsers maintain their own local DNS cache to speed up web browsing by storing mapped IP addresses. However, if a website changes its server IP or if bad data gets stored, your browser will continuously try to reach the wrong destination.
Clearing your browser’s internal DNS cache forces it to fetch fresh network records directly from the internet. This comprehensive guide walks you through quick checks and step-by-step methods to clear DNS caches across Google Chrome, Mozilla Firefox, and Microsoft Edge.
Quick Prerequisites & Basic Checks
Before jumping into browser-specific internal settings, perform these preliminary checks to ensure your internet connection itself is working properly:
-
Test Other Devices: Try loading the problematic website on a mobile phone using cellular data to confirm the site itself is online.
-
Try Incognito Mode: Open a private or incognito window. If the site loads fine, a corrupted browser cache or extension is likely the issue.
-
Restart Your Router: Power cycle your Wi-Fi router by unplugging it for 30 seconds before plugging it back in.
Solution 1: Clear Internal DNS Cache in Google Chrome
Google Chrome maintains its own socket connections and internal DNS cache independent of the host operating system. Flushing this specific cache resolves most site access issues.
Step 1: Access Chrome Net-Internals
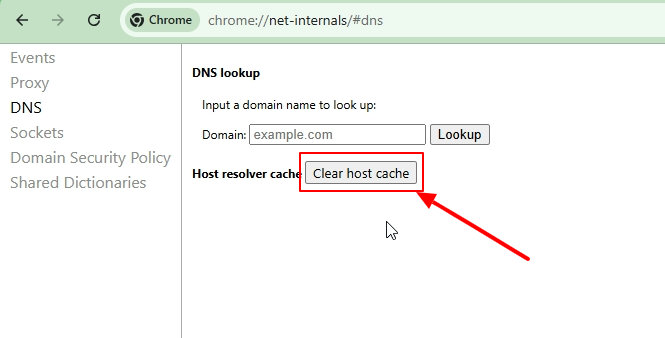
Open Google Chrome and navigate directly to the network settings page using the address bar:
-
Click on the address bar at the top of your Chrome window.
-
Type
chrome://net-internals/#dnsand press Enter.
Step 2: Clear Host Cache
Once the Net-Internals page loads, locate the DNS panel controls:
-
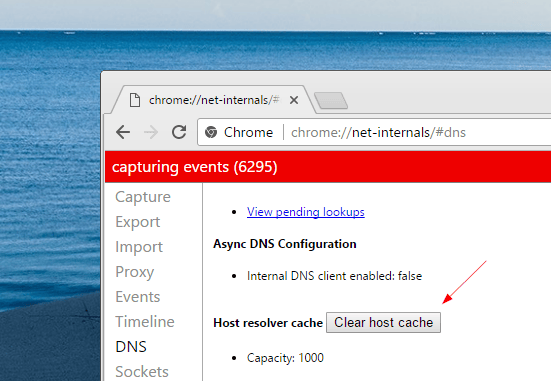
Find the Host resolver cache section near the top of the main window.
-
Click the Clear host cache button.
-
Next, navigate to
chrome://net-internals/#socketsin the address bar and press Enter. -
Click Flush socket pools to terminate stale network connections.
Verification: Open a new tab, type the URL that was previously failing, and press Enter. The site should now resolve to its updated IP address.
Solution 2: Clear DNS Cache in Mozilla Firefox
Mozilla Firefox handles local DNS storage internally to improve loading speeds. Flushing Firefox’s network cache involves toggling a hidden system variable or clearing local web data.
Method A: Clear DNS via Firefox Hidden Settings
-
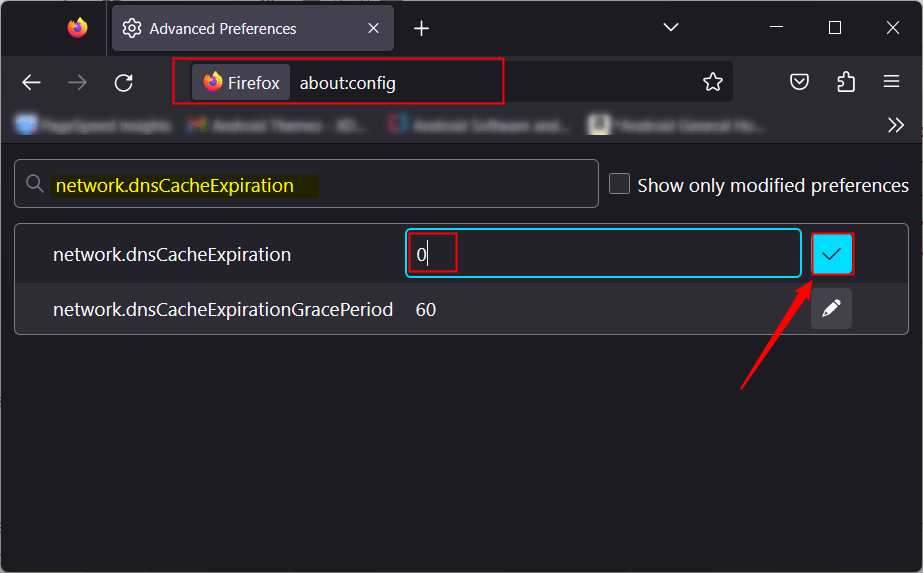
Open Firefox and type
about:configinto the address bar, then press Enter. -
Click Accept the Risk and Continue on the warning screen.

-
Type
network.dnsCacheExpirationinto the search bar. -
Click the Pencil icon (Edit) on the right side of the setting.
-
Change the numerical value to
0and click the Checkmark to save.
-
Wait 10 seconds, edit the value again, and change it back to its default value (
60).
Method B: Clear Firefox Offline Web Content
-
Click the Menu button (three horizontal lines) in the top-right corner.
-
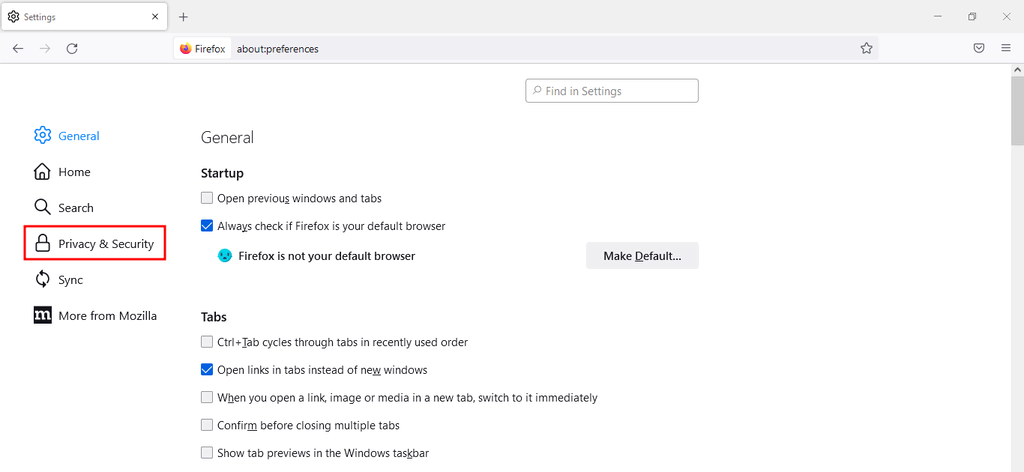
Select Settings, then click Privacy & Security from the left panel.
-
Scroll down to Cookies and Site Data and click Clear Data….
-
Check Cached Web Content and click Clear.
Verification: Close and reopen Firefox, then try accessing the website again to verify the new connection.
Solution 3: Clear DNS Cache in Microsoft Edge
Microsoft Edge is built on the Chromium engine, which means its internal network structure mirrors Google Chrome closely.
Step 1: Open Edge Net-Internals
-
Launch Microsoft Edge.
-
Type
edge://net-internals/#dnsinto the URL bar and press Enter.
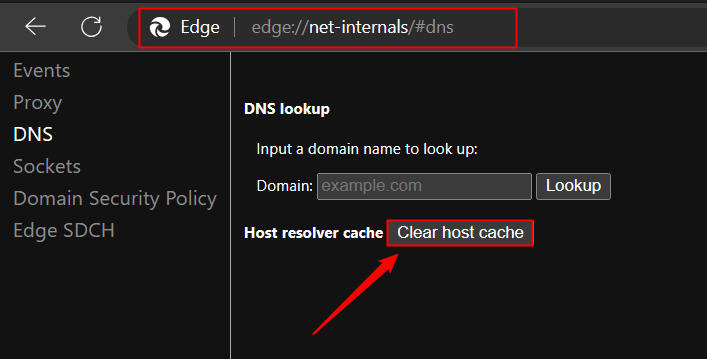
Step 2: Flush Host Cache and Sockets
-
Click the Clear host cache button located on the DNS setup screen.
-
Type
edge://net-internals/#socketsin the address bar and press Enter. -
Click the Flush socket pools button to clear active, idle socket connections.
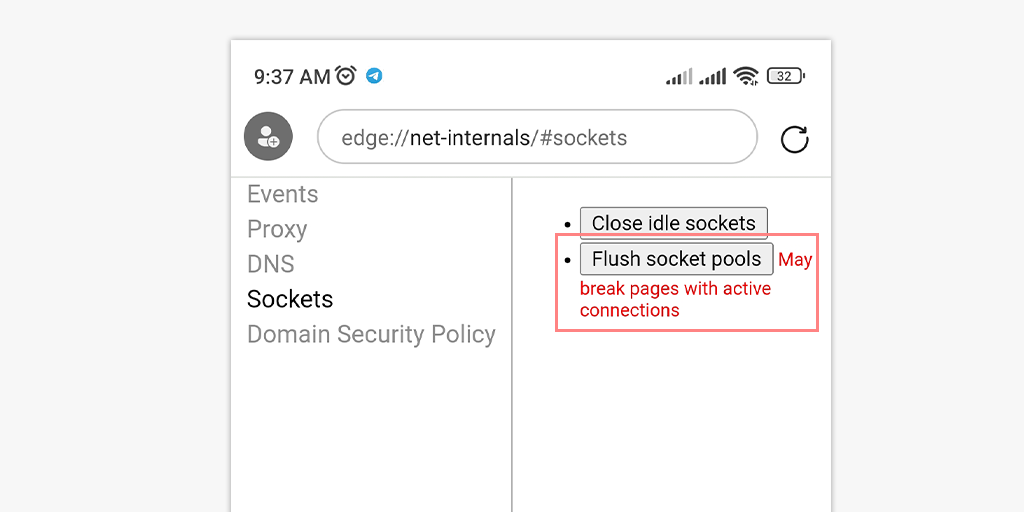
Verification: Try visiting the problematic web address to verify that the domain name resolves properly.
Solution 4: Flush Operating System DNS Cache
If clearing your browser’s DNS cache does not resolve the loading issue, your operating system may be serving stale DNS records at the system level.
On Windows 10 & 11
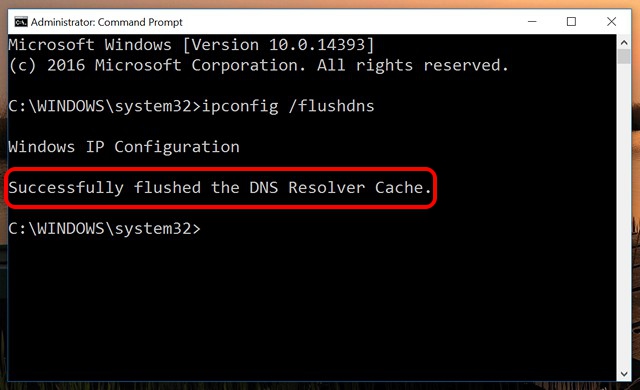
On macOS
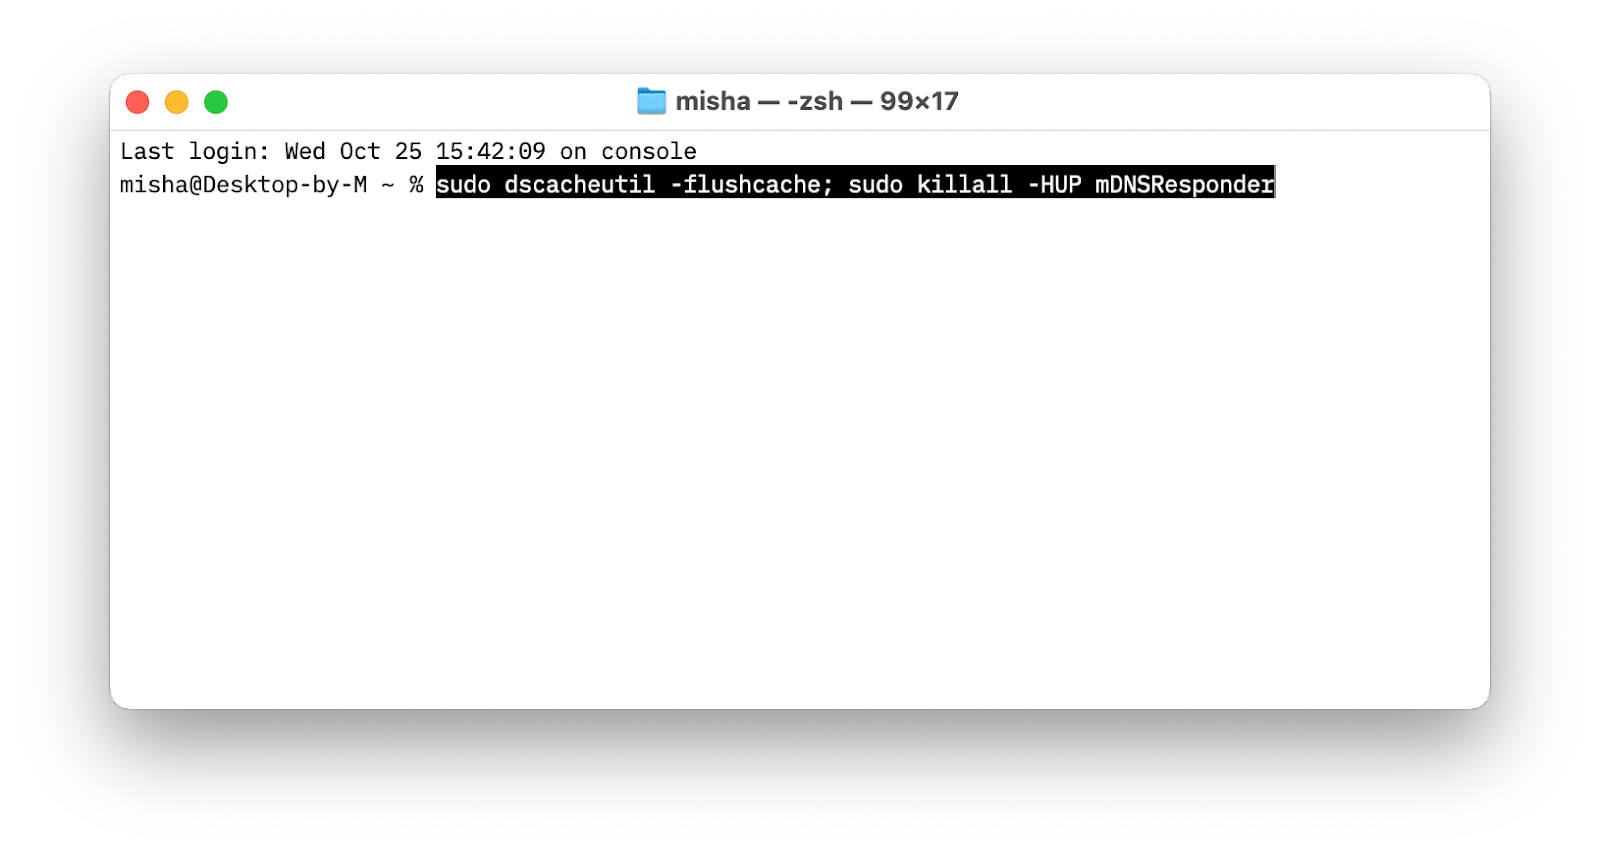
Verification: Type ping example.com in your command line tool to verify that your system resolves the correct external IP address.
Frequently Asked Questions (FAQ)
Does clearing DNS cache delete my browsing history or saved passwords?
No. Clearing the DNS cache only removes mapped numerical IP addresses associated with domain names. Your bookmarks, stored login passwords, browsing history, and autofill entries remain completely intact.
How often should I clear my browser’s DNS cache?
You only need to flush your DNS cache when encountering specific website loading errors, HTTP status errors (like 404 or 502), or immediately after changing network proxy or DNS server settings.
What is the difference between clearing browser cache and flushing DNS?
Clearing the browser cache removes stored web media files like images, scripts, and stylesheets. Flushing DNS specifically deletes the lookup directory that translates web addresses (like google.com) into server IP addresses.
Clearing the internal DNS cache across Chrome, Firefox, and Edge is a quick and effective troubleshooting step when encountering website connectivity errors. Paired with an operating system DNS flush, these steps ensure your system uses fresh network records. If loading issues persist after running through this guide, check your firewall settings or contact your Internet Service Provider.

Pony Lorenzo is the lead technical writer and managing editor at Finauraly Win. With extensive experience in operating system maintenance, software diagnostic testing, and digital productivity tools, Pony specializes in breaking down complex technical errors into actionable, step-by-step troubleshooting guides for Windows, macOS, Android, and Web applications.